Книга: Windows Server 2012 R2 Storage, Security, & Networking Pocket Consultant
Integrating DHCP and DNS
Integrating DHCP and DNS
DNS is used to resolve computer names in Active Directory domains and on the Internet. Thanks to the DNS dynamic update protocol, you don’t need to manually register DHCP clients in DNS. The protocol allows the client or the DHCP server to register the forward-lookup and reverse-lookup records in DNS as necessary. When configured by using the default setup for DHCP, current DHCP clients automatically update their own DNS records after receiving an IP address lease. You can modify this behavior globally for each DHCP server or on a per-scope basis.
Name protection is an additional feature in Windows Server 2012 R2. With name protection, the DHCP server registers records on behalf of the client only if no other client with this DNS information is already registered. You can configure name protection for IPv4 and IPv6 at the network adapter level or at the scope level. Name protection settings configured at the scope level take precedence over the settings at the IPv4 or IPv6 level.
Name protection is designed to prevent name squatting. Name squatting occurs when a computer not based on the Windows operating system registers a name in DNS that is already registered to a computer running a Windows operating system. By enabling name protection, you can prevent name squatting by computers not based on the Windows operating system. Although name squatting generally does not present a problem when you use Active Directory to reserve a name for a single user or computer, it usually is a good idea to enable name protection on all Windows networks.
Name protection is based on the Dynamic Host Configuration Identifier (DHCID) and support for the DHCID RR (resource record) in DNS. The DHCID is a resource record stored in DNS that maps names to prevent duplicate registration. DHCP uses the DHCID resource record to store an identifier for a computer along with related information for the name, such as the A and AAAA records of the computer. The DHCP server can request a DHCID record match and then refuse the registration of a computer with a different address attempting to register a name with an existing DHCID record.
You can view and change the global DNS integration settings by following these steps:
1. In the DHCP console, expand the node for the server with which you want to work, press and hold or right-click IPv4 or IPv6, and then tap or click Properties.
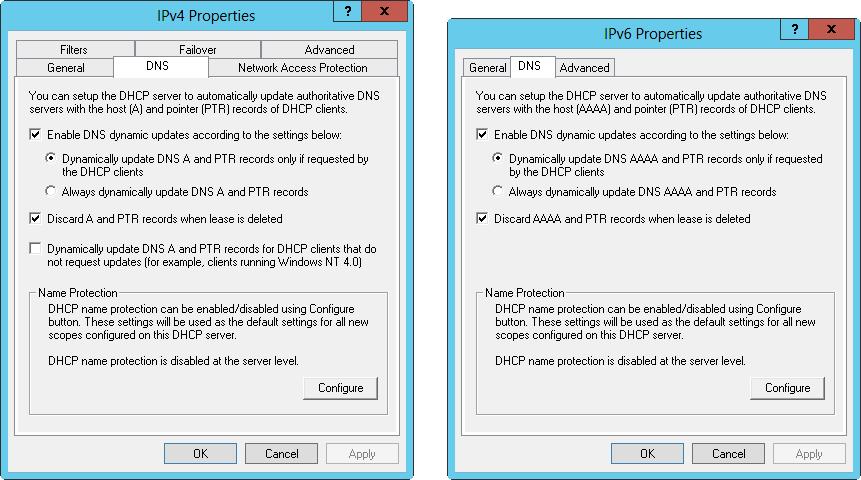
2. Tap or click the DNS tab. Figure 8–3 shows the default DNS integration settings for DHCP. Because these settings are configured by default, you usually don’t need to modify the configuration. However, if you only want host (A) records to be dynamically updated instead of both host (A) and pointer (PTR) records, select the Disable Dynamic Updates For DNS PTR Records check box.
IMPORTANT The default configuration, which registers and maintains both A and PTR records, assumes that you’ve configured reverse lookup zones for your organization. If you haven’t, attempts to register and update PTR records will fail. You can prevent repeated failed attempts to register and update PTR records by disabling dynamic updates for PTR records. If you disable this option in the IPv4 properties, you are disabling the option for all IPv4 scopes. Alternatively, you can use scope properties to disable the option on a per scope basis.

FIGURE 8–3 The DNS tab shows the default settings for DNS integration with DHCP.
3. Optionally, you can enable or disable the name protection feature. With name protection, the DHCP server registers records on behalf of the client only if no other client with this DNS information is already registered. To enable or disable name protection, tap or click Configure. In the Name Protection dialog box, select or clear Enable Name Protection, and then tap or click OK.
You can view and change the per-scope DNS integration settings by following these steps:
1. In the DHCP console, expand the node for the server with which you want to work, and then expand IPv4 or IPv6.
2. Press and hold or right-click the scope with which you want to work, and then tap or click Properties.
3. Tap or click the DNS tab. The options available are the same as those shown in Figure 8–3. Because these settings are configured by default, you usually don’t need to modify the configuration.
4. Optionally, you can enable or disable the name-protection feature. Tap or click Configure. In the Name Protection dialog box, select or clear Enable Name Protection, and then tap or click OK.
- Разработка приложений баз данных InterBase на Borland Delphi
- Open Source Insight and Discussion
- Introduction to Microprocessors and Microcontrollers
- Chapter 6. Traversing of tables and chains
- Chapter 8. Saving and restoring large rule-sets
- Chapter 11. Iptables targets and jumps
- Chapter 5 Installing and Configuring VirtualCenter 2.0
- Chapter 16. Commercial products based on Linux, iptables and netfilter
- Appendix A. Detailed explanations of special commands
- Appendix B. Common problems and questions
- Appendix E. Other resources and links
- IP filtering terms and expressions


