Книга: Windows Server 2012 R2 Storage, Security, & Networking Pocket Consultant
Creating sync shares and enabling SMB access
Creating sync shares and enabling SMB access
You create a sync share to identify a local folder on a sync server that will be synchronized and accessible to domain users via the Work Folders client. As sync shares are mapped to local paths on sync servers, I recommend that you create any folders that you want to use before creating sync shares. This will make it easier to select the exact folders with which you want to work. For details on adding the Work Folders role and configure Work Folders in Group Policy, see “Automatically configuring Work Folders” in Chapter 6.
To create a sync share, complete the following steps:
1. In Server Manager, select File And Storage Services, and then select Work Folders. On the Work Folders panel, select Tasks, and then select New Sync Share to open the New Sync Share Wizard. If the Before You Begin page is displayed, tap or click Next.
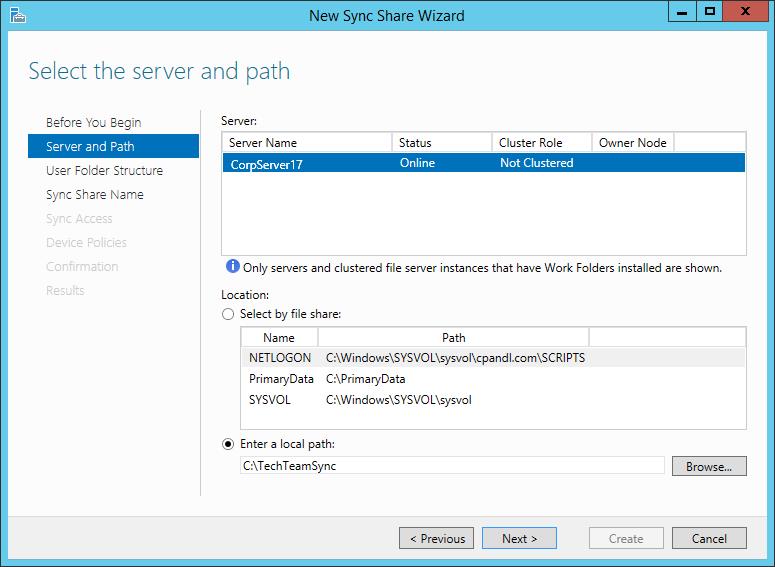
2. On the Select The Server And Path page, shown in Figure 3-13, select the server with which you want to work. Keep in mind that only servers that have the Work Folders role installed are available for selection.

FIGURE 3-13 Specify the server and folder to use.
3. When configuring sync shares, you have several options. You can:
? Add syncing to an existing file share by choosing the Select By File Share option, and then selecting the file share that should also be synced.
? Add syncing to an existing local folder by choosing Enter A Local Path, selecting Browse, and then using the Select Folder dialog box to locate and chose the folder to sync.
? Add syncing to a new local folder by choosing Enter A Local Path, and then entering the path to use.
4. When you are ready to continue, tap or click Next. If you specified a new folder location, you are prompted to confirm whether you want to create this folder. Select OK to create the folder and continue.
5. On the Specify The Structure For User Folders page, choose a folder naming format for the subfolders where user data is stored. To use only the user alias portion of the user’s logon name for naming user folders, choose User Alias. To use the full logon name for naming user folders, choose User alias@domain.
6. By default, all folders and files stored under the user folder are synced automatically. If you’d prefer that only a specific folder is synced, select the Sync Only The Following Folder check box, and then enter the name of the folder, such as Documents. Tap or click Next to continue
7. On the Enter The Sync Share Name page, enter a share name and description before tapping or clicking Next to continue.
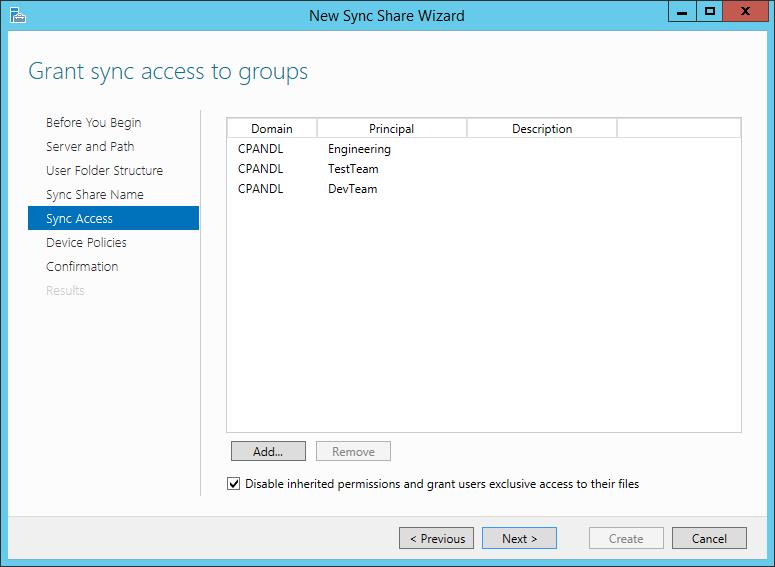
8. On the Grant Sync Access To Groups page, shown in Figure 3-14, use the options provided to specify the users and groups that should be able to access the sync share. To add a user or group, tap or click Add, and then use the Select User Or Group dialog box to specify the user or group that should have access to the sync share.
SECURITY ALERT Any users and groups you specify will be granted permissions on the base folder that allows the users and groups to create folders and access files in their folders. Specifically, Creator/Owner is granted Full Control on subfolders and files only. The users and groups are granted List Folder/Read Data, Create Folders/Append Data, Traverse Folder/execute File, Read/Write attributes on the base folder. Local System is granted Full Control of the base folder, subfolders, and files. Administrator is granted Read permission on the base folder.

FIGURE 3-14 Specify the users and groups that should have access to the sync share.
9. By default, inherited permissions are disabled and users have exclusive access to their user folders. Because of this, only the user who stores a file has access to this file on the share. If the base folder for the share has permissions that you want to be applied to user folders, such as those that would grant administrators access to user folders, clear the Disable Inherited Permissions check box. When you are ready to continue, tap or click Next.
10. On the Specify Device Policies page, you have two options. You can select Encrypt Work Folders to encrypt files in Work Folders on client devices. You can select Automatically Lock Screen And Require A Password to ensure that the screens on client devices lock automatically and require a password for access.
11. Tap or click Next to continue, and then confirm your selections. Select Create to create the sync share. If the wizard is unable to create the sync share, you’ll get an error and will need to note the error and take appropriate corrective action. A common error you might get occurs when the server hosts both Work Folders (which use the hostable web core) and the full Web (IIS) role. Before you can crate sync shares, you’ll need to modify the ports used so they do not conflict or install Work Folders on a server that doesn’t have the full Web (IIS) role.
12. If you did not select an existing file share during set up and want to enable the sync share for SMB access, open File Explorer. In File Explorer, press and hold or right-click the folder, select Share With, and then select Specific People. Finally, configure file sharing as discussed earlier in this chapter.
- Практическая работа 53. Запуск Access. Работа с объектами базы данных
- Разработка приложений баз данных InterBase на Borland Delphi
- Open Source Insight and Discussion
- Introduction to Microprocessors and Microcontrollers
- Chapter 6. Traversing of tables and chains
- Chapter 8. Saving and restoring large rule-sets
- Chapter 11. Iptables targets and jumps
- Chapter 5 Installing and Configuring VirtualCenter 2.0
- Chapter 16. Commercial products based on Linux, iptables and netfilter
- Appendix A. Detailed explanations of special commands
- Appendix B. Common problems and questions
- Appendix E. Other resources and links


